Making optical sensing “gettable” by providing simple, clear answers
Our world-class experts are available to help find answers to your toughest questions.

Our application experts share the best practices for OceanView 2.0 spectroscopy software and answer your questions on saving projects, building schematics and more. Watch the videos, or scroll down for a list of the most common questions answered by our Tech Support team.
Experts Yvette Mattley and Derek Guenther guide listeners on a tour of OceanView 2.0 software.
The second part of OceanView 2.0 Webinar Series covers The Wizard and the Power of the Schematic.
Q: When making irradiance measurements, which mode should I use when comparing two scans?
A: Relative mode. Measurements taken with a single spectrometer are accurate relative to one another, even if the spectral shape is uncorrected. That means you can take the ratio of one emissive measurement to another and get an accurate change in the percent signal as a function of wavelength.
Here’s a good rule of thumb: Relative irradiance mode is needed when comparing measurements taken by different spectrometers, when determining the spectral shape, or when looking for peak location and shifts. Absolute irradiance mode is needed to quantify the amount of light.
Q: When installing OceanView/OmniDriver/SpectraSuite/Overture on my Windows 8/8.1 PC, I get the error message “The third-party INF does not contain digital signature information.” How do I address this?
A: Windows 8 has a “driver signature enforcement” feature that is enabled by default. You may need to disable it.
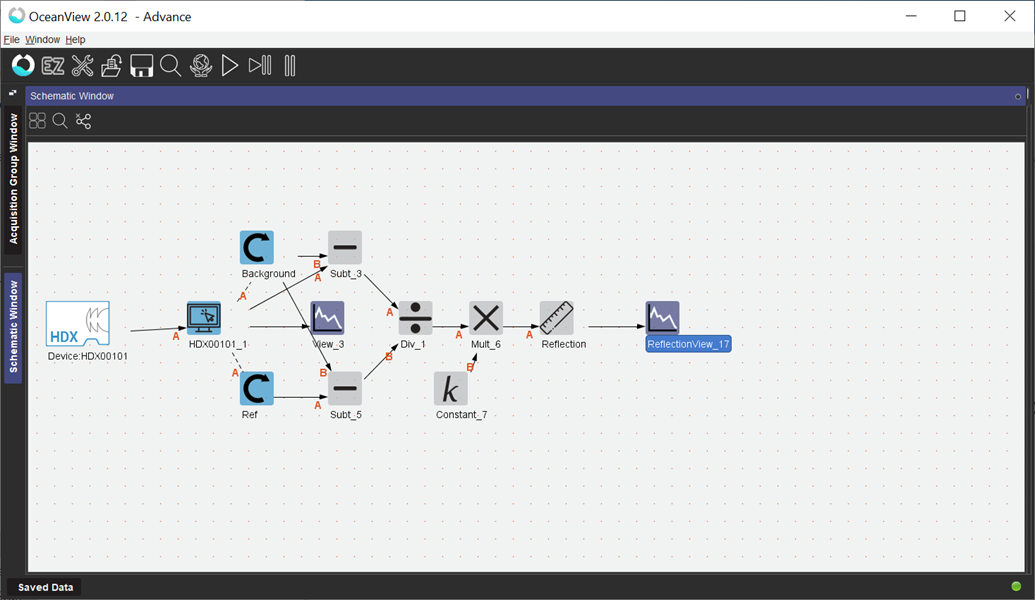
The Schematic View in OceanView presents data from your device(s) in a diagram format. Icons represent different devices and processes in your project as nodes, with data flow represented by arrows and links that connect those nodes. The nodes also indicate where data is processed or manipulated.
To save the dark spectrum (background) and reference in Schematic View, you must manually connect the reference and background nodes to the Aggregate node.
For example, here is a reflectance measurement in Schematic View before the Aggregate node is added:
In this example, your next step is to select “Configure graph saving” to add the Aggregate and File Writer. File Writer allows you to save and export processed date for each graph to an ASCII file.
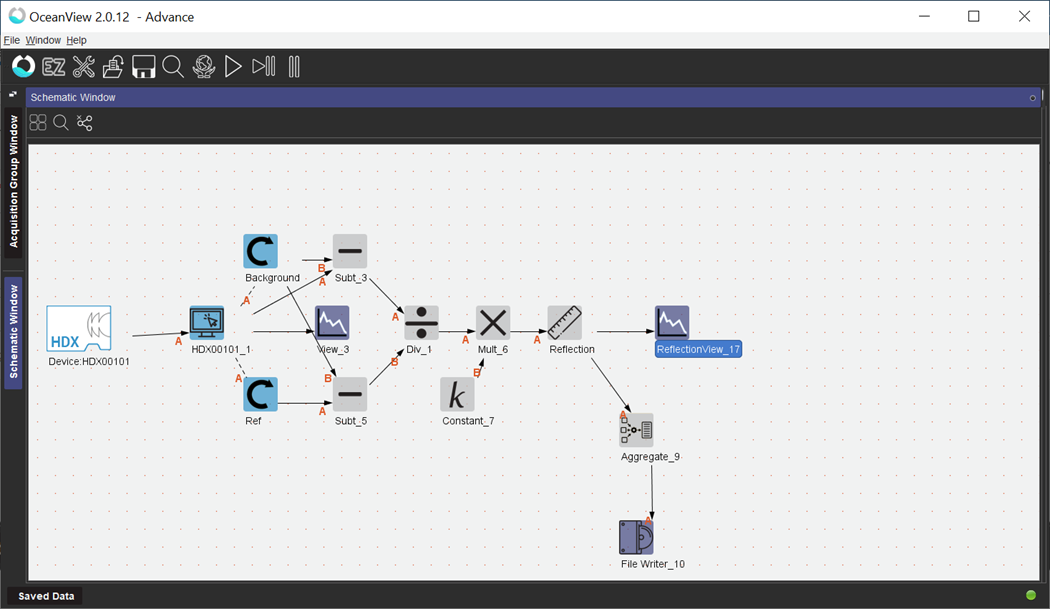
At this point, the Aggregate is still only connected to the processed spectrum (Reflection). One more step is required: to manually add connections from the reference, background and sample, if desired.

Now, you can save the processed spectrum, background, reference, and sample files when you select “Save graph to files.”
Q: I’m getting started in OceanView and don’t understand how best to use the data acquisition parameters that are available. What do I need to know?
A: Understanding the key data acquisition parameters available in OceanView will help ensure best results for your spectral measurements. This is important even if you’re using one of OceanView’s wizards, which guide you through the steps for specific measurements (absorbance, color and so on) but still require you to input most data acquisition parameters.
Integration Time
This is the first parameter that you will set. Integration time is the period of time over which the spectrometer collects photons and correlates with the intensity of the signal that is captured. We find that the best measurements are made when the signal intensity is between 80% and 90% of its full range. When setting integration time, be careful not to allow any pixels to become saturated, as these pixels will not provide useful data.
Quick tip: In OceanView 2.0.8 and higher versions, there’s a convenient feature that automatically selects the integration time appropriate for your setup. Activating this feature is as simple as selecting the Automatic option in the Acquisition Group Window of OceanView.
Scans to Average
This time-based averaging function specifies the number of discrete spectral acquisitions that the device driver accumulates before OceanView receives a spectrum. The higher the value, the better the signal-to-noise ratio (SNR). The SNR will improve by the square root of the number of scans averaged.
Boxcar Width
Boxcar smoothing is a technique that averages a group of adjacent detector elements across spectral data. For example, a boxcar width value of 5 averages each data point with 5 points to its left and 5 points to its right.
The greater the boxcar width value, the smoother the data and the higher the SNR. If the value entered is too high, a loss in spectral resolution will result and peaks will become flattened. The SNR will improve by the square root of the number of pixels averaged.
Quick tip: There’s a more detailed explanation of boxcar smoothing and its trade-offs in the Glossary section of our Technical Hub.
Electric Dark Correction
Many spectrometers have a small number of dark pixels. A dark pixel is an electrically active CCD detector pixel that has been physically coated to prevent any light from entering. Due to leakage, a small amount of electrons escape from the detector well even if there is absolutely no light.
To eliminate any error due to leakage, electric dark correction computes an average value of these dark pixels over 15 consecutive scans, and then subtracts this average value from all pixels in the spectrum. Although the algorithm specifies that 15 consecutive scans be averaged, the correction factor is applied as soon as the first spectrum of data becomes available. Then additional scans are averaged into the correction factor as these spectra become available. A running average of the most recent 15 scans is maintained.
The amount of electron leakage is proportional to the duration of the integration time. So, whenever the integration time is changed, the previous correction factor is discarded and we then begin to compute a new correction factor based entirely on the new integration time.
Non-linearity Correction
All Ocean Insight spectrometers are calibrated at the factory to maximize accuracy. One of the calibrations performed is to correct for detector non-linearity. This calibration consists of eight numbers used as the coefficients of a 7th order polynomial, which adjusts for the phenomenon that CCD detectors do not respond to stimuli photons uniformly as more electrons drain from the detector well. In other words, the efficiency of CCD detectors may be 30% when the well is half-full but may be only 20% when the well is completely drained of electrons.
By “efficiency” we mean the probability that an incoming photon will drain an electron from the CCD well; 100% efficiency means every incoming photon will drain one electron, while 50% efficiency means an incoming photon has only a 50% chance of causing an electron to drain. Non-linearity calibration is made by averaging together all pixels of the CCD array. Thus, we are assuming that all pixels respond about the same.
Quick tip: Detector linearity is different than absorbance linearity, which is associated with Beer’s Law.
"IMPORTANT: PLEASE REFRESH YOUR BROWSER IF YOU DO NOT SEE ANY SCREENSHOTS/ICONS IN THIS MATERIAL."
Q: What’s the difference between EZ and Advanced modes in OceanView software?
A: Options are great but can sometimes be overwhelming. So, in response to customer feedback, we updated OceanView to offer a simpler version with fewer functions. Now, in OceanView versions 2.0.8 and higher, users can switch between two modes: EZ and Advanced.
How to Determine Current OceanView Mode
When OceanView software is first installed, the default mode is EZ. At the far left of OceanView’s title bar and to the right of “OceanView 2.0.x (Licensed) -xx,” the display shows whether the user is in EZ (EZ) (Fig. 1) or Advanced (Advance) (Fig. 2) mode.
 |
 |
|
The OceanView title bar displays the mode of operation at far right. EZ mode is the default. |
“Advance” is the OceanView title bar indicates the Advanced mode of operation. |
How to Switch Between Operating Modes
Switching between modes is as simple clicking the EZ or Advanced icons in the upper toolbar. The EZ icon is simple to spot – it’s an “EZ.” The Advanced mode icon appears as silhouetted figures.
 |
 |
|
EZ Mode |
Advanced Mode |
What’s the Difference between EZ and Advanced Modes?
The primary difference between modes is that Advanced mode has more functions (represented in OceanView by icons).
Also, the Tools menu item under File | Tools is only available in Advanced mode. That includes access to the File | Tools submenu items Combine Calibration or Raw USB.
Here are the other differences between EZ and Advanced modes for graph features:
|
Graph Manipulation |
EZ Mode |
Advanced Mode |
|
Zoom out to maximum |
x |
x |
|
Zoom out |
x |
x |
|
Zoom in to graph |
x |
x |
|
Zoom to manual selection |
|
x |
|
Scale graph to fill window |
x |
x |
|
Scale graph height to fill window |
|
x |
|
Toggle graph panning mode |
x |
x |
|
Graph Input/Output |
EZ Mode |
Advanced Mode |
|
Copy data to clipboard |
x |
x |
|
Save graph to files |
x |
x |
|
Load ASCII file to graph |
|
x |
|
Configure graph saving |
x |
x |
|
Print graph |
|
|
|
Convert active spectrum to overlay |
|
x |
|
Delete overlay spectrum |
|
x |
|
Graph Specialty Features |
EZ Mode |
Advanced Mode |
|
View results in table form |
x |
x |
|
Reference spectrum |
|
x |
|
Background spectrum |
|
x |
|
Create strip chart |
|
x |
|
Splice data |
|
x |
|
View spectrum peaks |
|
x |
|
View trendline time trail |
|
x |
Q: Can I use OceanView software on tablet computers?
A: Yes. OceanView will run on tablets with Windows operating systems from XP and beyond except for Windows RT, WinPhone and CE. It will not run on tablets run by ARM processors.
Q: Why can’t OceanView version 2.0.5 find my remote (i.e. Ethernet, Wi-Fi) Ocean FX or Ocean HDX spectrometer?
A: To enable quicker USB spectrometer discovery, remote device probing (i.e. Ethernet or Wi-Fi) has been disabled by default as of version 2.0.5. To enable, go to the OceanView device manager, uncheck “Exclude remote device probing", and check “Automatically connect to devices” and “Automatically connect to remote devices.”
When OceanView is opened after doing this, it will scan for remote devices. If the device has not yet been configured for Ethernet or Wi-Fi, please see the Ethernet or Wi-Fi initialization instructions in the corresponding spectrometer’s operating instructions.
Q: How do I uninstall OceanView software?
A: If you need to uninstall OceanView, be sure that all directories are completely removed. There is one location where user settings and preferences get stored, and sometimes newer (often beta, pre-release) versions of OceanView may be confused by the older settings in user directories.
Those user directories can be located and manually removed as follows:
Windows XP: The User Directory is found in the following path: C:\Documents and Settings\userdir_oceanview-name, where name is your username on the PC. The user directory to be deleted is “userdir_oceanview-name.”
Windows 7: The User Directory is found in the directory under your username. To get to this directory, go to the “Start” button and select your username in the top of the right side of the menu. This location translates to C:\Users\name. The user directory to be deleted is “userdir_oceanview-name.”
Windows 8.x: The User Directory is found in C:\Users\. The user directory to be deleted is “userdir_oceanview-name.”
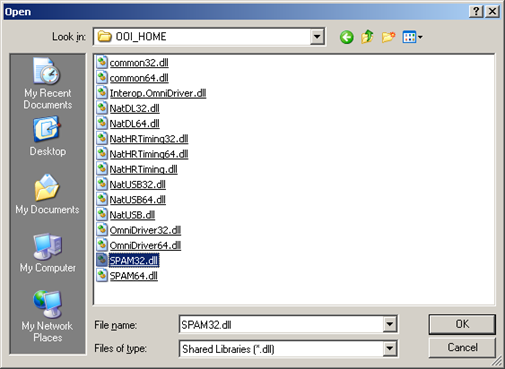
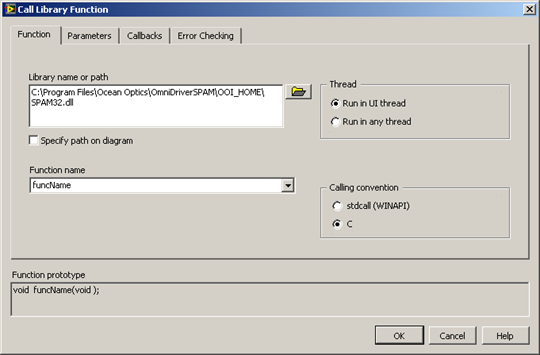
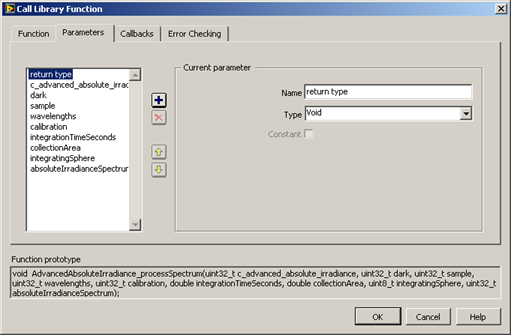
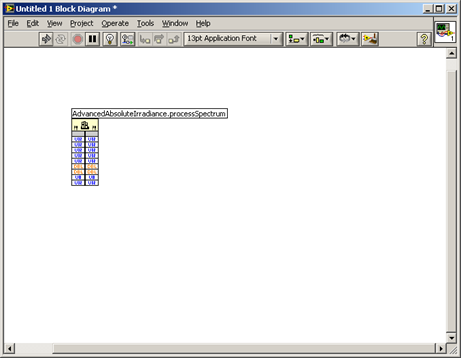
Q: How do I create a LabVIEW VI using OmniDriver and COM?
A: Here’s what we recommend:

Q: I can’t locate the MSVCR71.DLL. Now what?
A: OceanView is written in Java. Java has a somewhat contentious relationship with Microsoft Windows. Not everything always gets installed everywhere it needs to be all the time.
Never to fear! The simplest solution is just to copy (not move) MSVCR71.DLL from C:\Program Files\Ocean Optics\OceanView\oceanview\_jvm\bin to C:\Windows\system32. A full troubleshooting procedure follows:
The MSVCR71.DLL file is designed as a standard part of Windows. It should be in the following places (or the equivalent location in your system):
32-bit: C:\Windows\system32\MSVCR71.DLL
64-bit: C:\Windows\SysWOW64\msvcr71.dll
Check to see if the file can be found in the appropriate location for your system. If it’s not, this suggests a problem with Windows. Possibly, it was removed by uninstalling some software.
If the file is where it is supposed to be, we suggest copying it into the following locations:
C:\Program Files\Ocean Optics\OceanView\oceanview\_jvm\bin
C:\Program Files\Ocean Optics\OceanView\oceanview\bin
This should allow the DLL to be found more easily by Windows.
If you do not find the file in the location specified, please copy it from another computer with the same operating system into the specified location.
Q: Will legacy software like OOIBase32 still work?
A: In theory, yes, but only on 32-bit Windows operating systems up to Windows XP. This limits your options considerably, and it not a good choice for most customers. In fact, customers should be aware that we no longer support software purchased before June 30, 2017.
Q: Which spectroscopy software is required to operate my spectrometer?
A: Our current spectroscopy software is called OceanView. OceanView operates on 32- and 64-bit Windows, Macintosh and Linux operating systems. The software can control any Ocean Insight USB-based technology spectrometer.
Click to download OceanView Installation and download the Operation Manual.
Q: Which software is required to operate the NanoQuest MEMS-based spectral sensor?
A: NanoQuest software, which can be download from the Software Downloads web page.
Q: Which software is required to operate the NeoFox-GT fluorometer?
A: NeoFox Viewer is the operational software for this instrument. Download it from the Software Downloads page.
Q: Where do I find the password for software installation?
A: With OceanView and newer software, you received a software product key via email at the time of purchase and on your order acknowledgement. If you misplaced this or have an earlier version of our software, contact us via chat or info@OceanInsight.com with this information:
OceanView password
To recover your software key, please provide us with:
Note: If you’re using the OceanView 10-day free trial, the software begins working upon installation. If you decide to purchase OceanView, you will receive your software key as described above. With the software key you can activate OceanView by choosing Help/Licensing from the trial version software, then entering your product key and clicking the “Activate” button.
OmniDriver/OmniDriver + SPAM password
To recover your password, please provide:
SpectraSuite password
To recover your password, please provide:
Note: SpectraSuite purchases made prior to June of 2009 used a different SpectraSuite password and will not work with any SpectraSuite versions compatible with 64-bit Windows and Mac OS X 10.6 and newer.
Q: How do I extract data from a ProSpec file without SpectraSuite?
A: Here are a few basic steps to help you make sense of your data:
Q: What is the order of operations for spectral calculations in Ocean Insight software?
A: Please follow these simple steps for spectral calculations:
Note: If you change the Integration Time, Averaging or Boxcar Smoothing, you must take a new Dark (Bias) subtraction. This is done while the Linearity Correction is enabled.
Q: Can I use a 32-bit version of OceanView or SpectraSuite software on my 64-bit Windows operating system?
A: No. The 32-bit Windows versions of OceanView and SpectraSuite software are set up for use with the 32-bit ezusb driver. There is no way to configure 32-bit OceanView or SpectraSuite software to work with 64-bit Windows device drivers or with a 64-bit Windows operating system*. You will need to use a 64-bit Windows version on a 64-bit Windows operating system.
*Note. With some programming languages, it is possible and sometimes necessary to use a 32-bit Windows version of OmniDriver or OmniDriver+SPAM on a 64-bit Windows operating system.
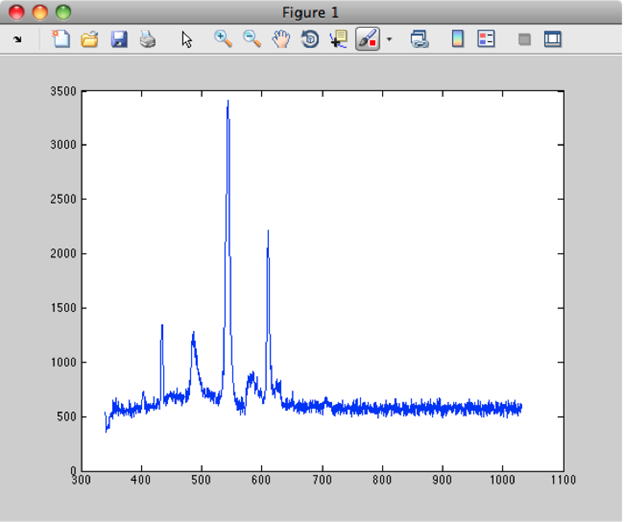
Q: How do I control my USB spectrometer from OmniDriver and MATLAB?
A: If you want to use MATLAB® from MathWorks to directly control your USB spectrometers, reading and post-processing spectra from .m files, you’re in luck: MATLAB and OmniDriver are old friends.
OmniDriver includes a file in OOI_HOME called OmniDriver.jar, which provides the complete class structure of OmniDriver to any program that can utilize Java JAR files — including MATLAB! Calling the OmniDriver Wrapper can be as simple as this:
|
>> javaaddpath('C:\Program Files\Ocean Optics\OmniDriver\OOI_HOME\OmniDriver.jar'); >> wrapper = com.oceanoptics.omnidriver.api.wrapper.Wrapper(); >> wrapper.openAllSpectrometers(); >> spectrum = wrapper.getSpectrum(0); >> wavelengths = wrapper.getWavelengths(0); >> plot(wavelengths, spectrum); |
Please note: If MATLAB is having trouble finding the native USB device drivers, something like this:
|
java.lang.ExceptionInInitializerError at com.oceanoptics.uniusb.USB.<init> (USB.java:20) at com.oceanoptics.omnidriver.features.USBImpl.<init> (USBImpl.java:62) (blah blah blah) at com.oceanoptics.omnidriver.api.wrapper.Wrapper.openAllSpectrometers (Wrapper.java:507) Caused by: java.lang.RuntimeException: Failed to load any native library for USB. Tried base filenames: NatUSB_64, NatUSB_32, NatUSB at com.oceanoptics.uniusb.UniUSB.<clinit>(UniUSB.java:75) |
This indicates that MATLAB’s JNI (Java Native Interface) can’t find the .DLL (or .so or .dylib for Linux and Mac) “native libraries” that OmniDriver uses to talk over USB on each operating system. Unfortunately, there is no way to dynamically “re-point” MATLAB to look at a new path after MATLAB launches (this is not the same as CLASSPATH, nor is it the same as LD_LIBRARY_PATH).
Fortunately, you can follow a quick and simple procedure to update MATLAB’s JNI path between MATLAB sessions:
To learn more about matlabroot, see these links (valid at writing):
To time operations in MATLAB, use this:
|
% initialize spectrometer wrapper = com.oceanoptics.omnidriver.api.wrapper.Wrapper(); wrapper.openAllSpectrometers();
% set integration time to 1 millisec (1000 microsec) wrapper.setIntegrationTime(0, 1000);
% take 10,000 spectra time_start = datestr(now,'dd-mm-yyyy HH:MM:SS.FFF'); for i = 1:10000 spectrum = wrapper.getSpectrum(0); end time_end = datestr(now,'dd-mm-yyyy HH:MM:SS.FFF');
% display the time it took display(time_start); display(time_end); |
Q: Why can’t my computer locate the drivers when I install the Windows version of OceanView/OmniDriver/OmniDriver+SPAM/SpectraSuite/Overture software?
A: When you install the Windows version of our software, the driver installation works a little differently for some spectrometers.
After you install the software, attach your spectrometer to the computer. The “Windows Found New Hardware” wizard will open, but may not find the device driver. Here’s what to do:
Note: Upon completion of the steps above, you may encounter the error message, “The third-party INF does not contain digital signature information.” You can address that issue in this FAQ. [Link to the FAQ above about installing OceanView/OmniDriver/SpectraSuite/Overture on my Windows 8/8.1 PC, and getting the error message “The third-party INF does not contain digital signature information.”]
In this video, we guide you through the unpacking of an Ocean Optics spectrometer, describing the items you’ll receive and explaining why installing software is always your first step.
In this video animation, follow the journey photons take as they encounter components within the spectrometer optical bench, undergoing various processes before becoming a spectrum.

Our world-class experts are available to help find answers to your toughest questions.